Two Factor Authentication Java Example
Two-Factor Authentication with Authy, Java and Servlets
For new development, we encourage you to use the Verify API instead of the Authy API. The Verify API is an evolution of the Authy API with continued support for SMS, voice, and email one-time passcodes, an improved developer experience, and new features including:
- Twilio helper libraries in JavaScript, Java, C#, Python, Ruby, PHP, and Go.
- Access via the Twilio CLI.
- Improved visibility and insights.
- A push authentication SDK embeddable in your own application.
You are currently viewing the Authy API. New features and development will be added only to the Verify API. Check out the FAQ for more information and the migrating to Verify guide to get started.
This Java Servlets sample application demonstrates two-factor authentication (2FA) using Authy. To run this sample app yourself, download the code and follow the instructions on GitHub.
Adding two-factor authentication (2FA) to your web application increases the security of your user's data. Multi-factor authentication determines the identity of a user by validating first by logging into the app, and then through their mobile devices using Authy.
For the second factor, we will validate that the user has their mobile phone by either:
- Sending them a OneTouch push notification to their mobile Authy app or
- Sending them a one-time token in a text message sent with Authy via Twilio.
See how VMware uses Authy 2FA to secure their enterprise mobility management solution.
Configure Authy
If you haven't already, now is the time to sign up for Authy. Create your first application, naming it as you wish. After you create your application, your production API key will be visible on your dashboard:
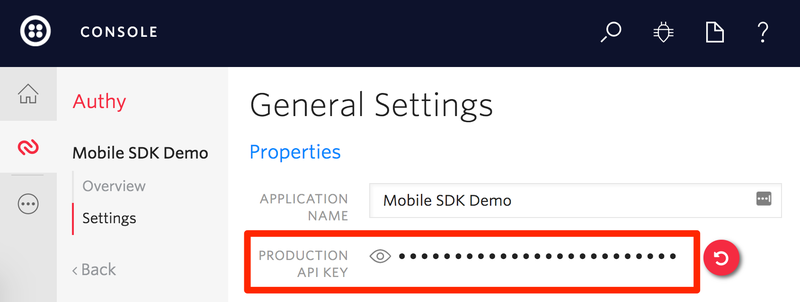
Once we have an Authy API key, we store it on this .env file, which helps us set the environment variables for our app.
You'll also want to set a callback URL for your application in the OneTouch section of the Authy dashboard. See the project's README for more details.
src/main/java/com/twilio/authy2fa/servlet/RegistrationServlet.java
Let's take a look at how we register a user with Authy.
Register a User with Authy
When a new user signs up for our website, we call this controller, which handles saving our new user to the database as well as registering the user with Authy.
All Authy needs to get a user set up for your application is the email, phone number and country code. In order to do two-factor authentication, we need to make sure we ask for these things at the point of sign up.
Once we register the user with Authy we can get the user's authy_id back. This is very important since it's how we will verify the identity of our User with Authy.
src/main/java/com/twilio/authy2fa/servlet/RegistrationServlet.java
Having registered our user with Authy, we then can use Authy's OneTouch feature to log them in.
Log in with Authy OneTouch
When a User attempts to log in to our website, we will ask them for a second form of identification. Let's take a look at OneTouch verification first.
OneTouch works as follows:
- We check that the user has the Authy app installed.
- In case they do, they will receive a push notification on their device.
- The user hits Approve in their Authy app.
- Authy makes a POST request to our app with an
approvedstatus. - We log the user in.
TwilioDevEd/authy2fa-servlets/src/main/java/com/twilio/authy2fa/service/ApprovalRequestService.java
Now let's look at how to send a OneTouch request.
Send the OneTouch Request
When our user logs in, our app decides which two-factor authentication provider will be used. It can be Authy OneTouch or an SMS token.
Authy OneTouch will be used when the user has a registered OneTouch device.
We use the sendApprovalRequest method to create an approval request. It takes an ApprovalRequestParamater object with at least the following properties configured:
- The Authy user ID.
- The message that will be displayed in the device.
Here is an example about how to build the parameters object.
ApprovalRequestParams parameters = new ApprovalRequestParams.Builder( Integer.valueOf(user.getAuthyId()), "Request login to Twilio demo app") .addDetail("email", "alice@example.com") .addDetail("name", "Alice") .addHiddenDetail("phoneNumber", "555-5555") .build();
TwilioDevEd/authy2fa-servlets/src/main/java/com/twilio/authy2fa/service/ApprovalRequestService.java
Once we send the request we need to update our user's AuthyStatus based on the response. But first we have to register a OneTouch callback endpoint.
Configuring the OneTouch callback
In order for our app to know what the user did after we sent the OneTouch request, we need to register a callback endpoint with Authy.
Note: In order to verify that the request is coming from Authy, we've written the helper method validate that will halt the request if it appears that it isn't coming from Authy.
Here in our callback, we look up the user using the Authy ID sent with the Authy POST request. Ideally at this point we would probably use a websocket to let our client know that we received a response from Authy. However for this version we're going to keep it simple and just update the AuthyStatus on the User. What our client-side code needs to do is to check for user.AuthyStatus == "approved" before logging him/her in.
src/main/java/com/twilio/authy2fa/servlet/authy/CallbackServlet.java
Our application is now capable of using Authy for two-factor authentication. However, we are still missing an important part: the client-side code that will handle it.
Disabling Unsuccessful Callbacks
Scenario: The OneTouch callback URL provided by you is no longer active.
Action: We will disable the OneTouch callback after 3 consecutive HTTP error responses. We will also
- Set the OneTouch callback URL to blank.
- Send an email notifying you that the OneTouch callback is disabled with details on how to enable the OneTouch callback.
How to enable OneTouch callback? You need to update the OneTouch callback endpoint, which will allow the OneTouch callback.
Visit the Twilio Console: Console > Authy > Applications > {ApplicationName} > Push Authentication > Webhooks > Endpoint/URL to update the Endpoint/URL with a valid OneTouch callback URL.
Handle Two-Factor in the Browser
We've already taken a look at what's happening on the server side, so let's step in front of the cameras and see how our JavaScript is interacting with those server endpoints.
When we expect a OneTouch response, we will begin polling /authy/status until we see Authy status is not empty.
src/main/webapp/javascript/application.js
Let's take a closer look at how we check the login status on the server.
Check Login Status
This is the endpoint that our JavaScript is polling. It is waiting for the user Authy status.
src/main/java/com/twilio/authy2fa/servlet/authy/OneTouchStatusServlet.java
Finally, we can confirm the login.
Finish the 2FA Step
If the AuthyStatus is approved, the user will be redirected to the account page, otherwise we'll show the login form with a message that indicates the if the request was denied or unauthorized.
src/main/java/com/twilio/authy2fa/servlet/authentication/ConfirmLogInServlet.java
That's it! We've just implemented two-factor auth using three different methods and the latest in Authy technology.
Where to Next?
If you're a Java developer working with Twilio, you might enjoy these other tutorials:
SMS and MMS Notifications
Faster than e-mail and less likely to get blocked, text messages are great for timely alerts and notifications. Learn how to send out SMS (and MMS) notifications to a list of server administrators.
Click-To-Call
Click-to-call enables your company to convert web traffic into phone calls with the click of a button
Did this help?
Thanks for checking out this tutorial! If you have any feedback to share with us, we'd love to hear it. Connect with us on Twitter and let us know what you build!
garlandthiparract.blogspot.com
Source: https://www.twilio.com/docs/authy/tutorials/two-factor-authentication-java-servlets
0 Response to "Two Factor Authentication Java Example"
Post a Comment